Android Selected Button/List Screenshots
Android

Android says “what selector?” – list items & buttons

The Butt is On

I’ve been optimizing and cleaning up the AlertMe for Android app to put into the Google Play marketplace, and after using drawable shapes I figured that it was time to throw away those duplicate button images. The original used a technique familiar with web developers/designers: change the whole image according to the state of an element, in this case a button:

<?xml version="1.0" encoding="utf-8"?>
<selector xmlns:android="http://schemas.android.com/apk/res/android">
    <item 
        android:state_enabled="false"
        android:drawable="@drawable/ic_home_status_home" /><!-- default state -->
    <item 
        android:state_pressed="true" 
        android:state_enabled="true"
        android:drawable="@drawable/ic_home_status_home_pressed" /><!-- pressed state -->
    <item 
        android:state_focused="true" 
        android:state_enabled="true"
        android:drawable="@drawable/ic_home_status_home_focus" /><!-- focus/hover state -->
    <item 
        android:state_enabled="true"
        android:drawable="@drawable/ic_home_status_home" /><!-- default state, just in case -->
</selector>

All 3 images; a bit repetitive, no?

All rather neat so far. Now, developing for mobile you start to appreciate things like space – particularly when you phone is rather low on it (true story) – and the same image is kind of wasteful. Images are the worst to keep around for mobile application because they can only compress so far – while text is rather easy. When I did the Letchworth Beer Fest app I used shapes to define a background rectangle and a single image over the top, so now I save on 2 less images and a cleaner looking ‘button’ to boot:

<!-- excerpt for 'pressed' state: -->
<item android:state_pressed="true" android:state_enabled="true">
    <layer-list>
        <item>
            <shape>
                <gradient
                    android:startColor="@color/button_pressed_light"
                    android:endColor="@color/button_pressed_dark"
                    android:angle="270" /><!-- gradient box, just because -->
                <stroke
                    android:width="1dp"
                    android:color="@color/button_pressed_dark" /><!-- 1dp border -->
                <corners android:radius="3dp" /><!-- neat - round corners -->
                <padding
                    android:left="10dp"
                    android:top="10dp"
                    android:right="10dp"
                    android:bottom="10dp" />
            </shape>
        </item><!-- end box -->
        <item><!-- now overlay the image on top: -->
            <bitmap
                android:src="@drawable/ic_home_status_home"
                android:gravity="center" />
        </item>
    </layer-list>
</item>
<!-- now an excerpt for default state -->
<item android:state_enabled="true">
    <layer-list>
    <item>
        <shape>
            <solid android:color="@color/button_default_light" /><!-- can be anything, but I've made it transparent -->
            <corners android:radius="4dp" />
            <padding
                android:left="10dp"
                android:top="10dp"
                android:right="10dp"
                android:bottom="10dp" />
        </shape>
    </item>
    <item>
        <bitmap
            android:src="@drawable/ic_home_status_home"
            android:gravity="center" />
    </item>
    </layer-list>     
</item>

List item select?

When I tried to use the same states for list items in my odd/even rendered lists, I switched over from setBackgroundColor to setBackgroundResource. However I found there wasn’t a change in the pressed or focus states. Some Googling later I found these states worked for me:

<?xml version="1.0" encoding="utf-8"?>
<!-- for the 'odd' background; you can guess there is another file using '@color/menu_even' -->
<selector xmlns:android="http://schemas.android.com/apk/res/android">
    <item android:state_enabled="false" android:state_pressed="false">
        <shape>
            <solid android:color="@color/menu_odd" />
        </shape>
    </item>
    <item android:state_pressed="true" android:state_enabled="true">
        <shape>
            <gradient
                android:startColor="@color/button_pressed_light"
                android:endColor="@color/button_pressed_dark"
                android:angle="270" />
        </shape>
    </item>
    <item android:state_focused="true" android:state_enabled="true">
        <shape>
            <gradient
                android:startColor="@color/button_selected_light"
                android:endColor="@color/button_selected_dark"
                android:angle="270" />
        </shape>
    </item>
    <item android:state_selected="true" android:state_pressed="false">
        <shape>
            <gradient
                android:startColor="@color/button_selected_light"
                android:endColor="@color/button_selected_dark"
                android:angle="270" />
        </shape>
    </item>
    <item android:state_enabled="true">
        <shape>
            <solid android:color="@color/menu_odd" />
        </shape>
    </item>
</selector>

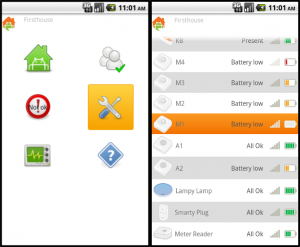
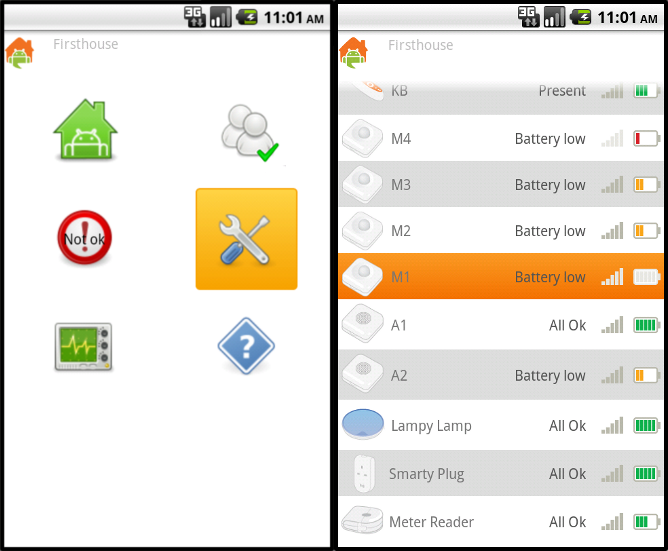
The result is now a more unified look-and-feel as the button and list item states use the same focused and pressed highlighting colours.
Android Selected Button/List Screenshots

Screenshots of the a pressed button (left) and a focused list item (right)

Standard
Web

New Year upgrade with WordPress 3.3

Upgrading my desktop is a simple matter of clicking confirm. I know it is probably possible to set up WordPress to do the same, but I like to give the least amount of rights to the web-data user over my files. Here is my quick checklist of the 3.2.x upgrade to 3.3(.1)

Database backup

Don’t skimp on this step – if for some reason the upgrade fails you have the ability to restore it to it’s preupdate state. I create a full backup of the database:

mysqldump --user=root --add-drop-database --add-drop-table --complete-insert --routines -p WORDPRESS_DB > mysqldump_WP_TODAYSDATE.sql

Note that I like using complete inserts and drop tables for ease of reading (and to closely follow more standard SQL).

New code shuffle

Download the new version of WordPress and expand the files. I don’t backup the uploaded wp-content – I simply move them from the old locations to the appropriate directories in the new codebase. This way a backup of the old code also exists. Also worth noting that before moving the directories and files you need it’s probably a good idea to set the WordPress site under maintenance.

Here is the list of items you will simply need to move over:

  • /wp-content/uploads
  • /wp-config.php – you can copy rather than move to save a backup

The other directories – /wp-content/plugins and /wp-content/themes – are a little more tedious: you compare the directory contents before you move things. However, if certain items have an update that coincides with the new WordPress then these can be upgraded directly into the new codebase.

Beware – if you have installed plugins that create their own directories outside the normal wp-content convention you will need to move these too!

Permissions

You should have all the external assets (from WordPress) in the appropriate directories of the new codebase. Now check if the permissions need to be changed – like setting the group user to the web-data user or allowing code to be executable.

After this step, it’s time for the ‘great move’.

Move and test

Move or rename the old codebase, followed by moving or renaming the new codebase to the original location. Disable the maintenance and test out your new install. If you were logged in as an administrator before the change you should be able to see if you need to confirm any database updates from the dashboard.

Hopefully all the files and plugins are still in order and your site should look…. exactly the same as it did before.

Standard
Random

Quick and dirty ssh tunnel setup

My quick and dirty setup to set up a SSH tunnel to home machines from our remote web server.

This sets up a way to access our home machine via our remote web host – just do a ssh -p PORTNUM localhost when logged in at USERNAME@REMOTESERVER.NET

Setup of keys; creating a passphrase

First, make sure that you’ve created an RSA public/private key pair:

ssh-keygen -t rsa

I had to use this since I completely forgot the old passphrase I set up in the past. Now, rather than copy over to authorized_keys to the remote server it is far nicer to use:

ssh-copy-id -i ~/.ssh/id_rsa.pub USERNAME@REMOTESERVER.NET

Passphrase permanence

To stop you from being asked for the passphrase every time you want to SSH into the remote server do:

ssh-add

.. on the (home) machine you want to access. Follow the prompts to ‘record’ your passphrase. Now we can move onto the actual port forwarding itself.

Basic port forward

Now, on the (home) machine you did a ssh-add to, I’ve set up the forward with:

while true;
do ssh -C -R PORTNUM:localhost:SSH_PORT USERNAME@REMOTESERVER.NET;
sleep 5;
done

The SSH_PORT is normally 22. I use sleep 5 so there is some time to escape out of this infinite loop if I want to cleanly close the session running this bash script. Thus the script is left running on untouched unless I need to kill it off.

Standard
Web

New toys, new troubles: Nginx, FastCGI and WordPress checklist

Before ‘the great harddrive fire of 2011’ we had FastCGI running on the server for some small projects. With everything else using Apache it was rather refreshing to see that there were faster, more lightweight alternatives.

Starting from a fresh slate, we’ve waved off the slow and clunky httpd for Nginx but in exchange for the shiner newer model there’s a bit of a learning curb in how the new kid does things. In addition, an upgrade in blog/CMS was in consideration – now things were running faster perhaps there was some forgiveness in using PHP and WordPress. My starting point was aged a little, so this post documents my time with installing and securing WordPress 3.2.1. Continue reading

Standard