
Splash page - Aliss
Whoa, I started this post in November last year. It’s another long-winded one, so if tl;dr : I played around with SVG and Javascript (again – note it’s not guaranteed to work with all browsers.)
What seems like ages ago I created 2 SVG drawings which I then made manipulatable via ECMA script. Then I hooked it into a webpage and used Javascript to invoke the SVG methods in a simple interactive interface as a basis for an RPG. ‘Post harddrive fire’; being unable to find the original HTML or Javascript I used for that first version, I was just left with the drawings crying out to be used once more. It has been a while between the old version and the new, and though the browser capabilities and available Javascript libraries have definitely improved it seems like not much has truly progressed. The support is still poor, and sometimes incorrect. The Javascript libraries, though making content creation easier, sometimes seems to have strange limitations (probably due to the SVG combination.) Such factors lead to my dismay that to Flash still has a better coverage on capabilities over more textual and non-propriety alternatives like the canvas element.
Below are the steps I used that recreates the interactive SVG/Javascript splash page (which normally is found randomly at the base-level URL).
Begining with SVG
Inkscape was a new thing when I drew the 2 graphics. It was excuse to exercise the tablet too – which wasn’t too old at the time either. I started small: simple drawings and simple shapes, so I can make movement easier to deal with. The first thing was ensuring that sections of the drawing were logically grouped into layers – arms have a layer each and the entire head has one layer.
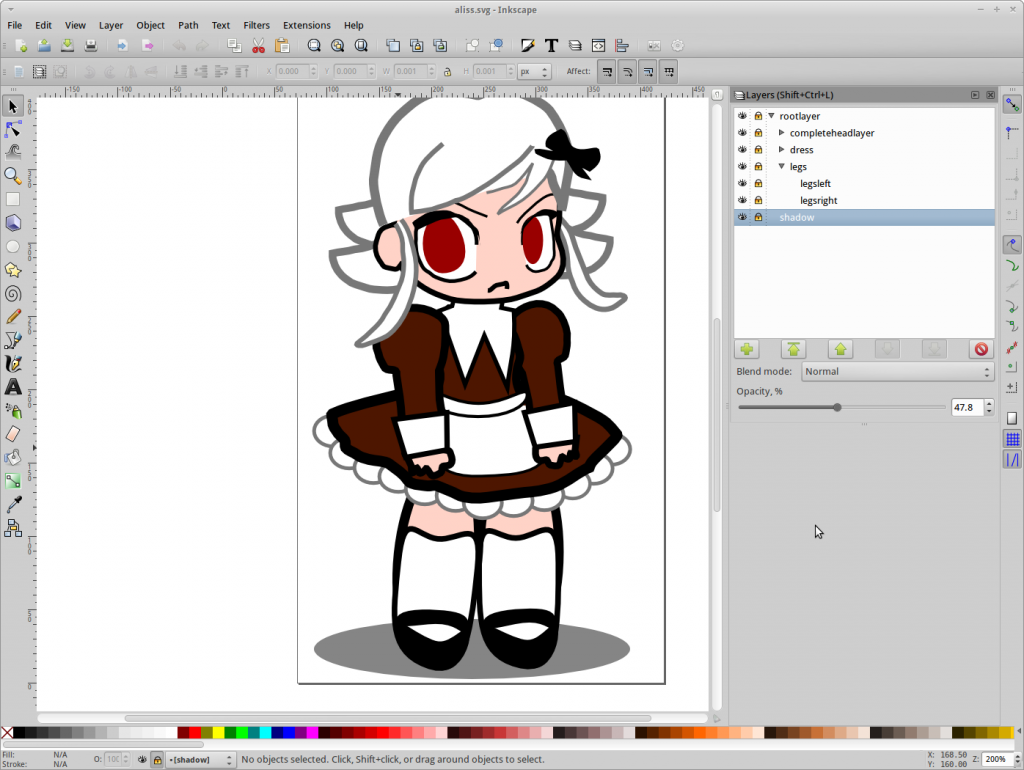
Inkscape - layers screenshot
One thing I have not yet figured out back then (and at still haven’t) is if through the Inkscape UI you can create nested layers: after all it employs shape groupings ( items) for layers and object groups. However, as with a plan XML document you can edit the file manually, and I promptly discovered that Inkscape can at least pick up nested layers. This makes things easier for the first interactive function in ECMA you can write: a character flip. If all the layers were inside one root layer then it is just the trivial matter to call the transform function over it.
Woo, remember your matrix transforms? (I don’t, but clearly I did in the past..)
/**
* This goes in the SVG file itself, in <script></script>
* What this does is flip the grouping with ID completeheadlayer to the right.
*
* I escape all the quotes, unless you put it all in <![CDATA[ CODE HERE ]]>
*/
function headdirection_right()
{
M = "matrix(";
M = M + "1 0 0 1 0 ";
M = M + "0";
M = M + ")";
Q = svgDocument.getElementById("completeheadlayer");
Q.setAttribute("transform",M);
} |
/**
* This goes in the SVG file itself, in <script></script>
* What this does is flip the grouping with ID completeheadlayer to the right.
*
* I escape all the quotes, unless you put it all in <![CDATA[ CODE HERE ]]>
*/
function headdirection_right()
{
M = "matrix(";
M = M + "1 0 0 1 0 ";
M = M + "0";
M = M + ")";
Q = svgDocument.getElementById("completeheadlayer");
Q.setAttribute("transform",M);
}
Frame animation
If you are familiar with Javascript, ECMA is like its strict older brother (as seen in the previous example.) Some things are native to both, and thus if you have done frame animation in one it is practically interchangeable.
To kick off the start-up function that starts the timing place in the SVG head tag the attribute onload with value STARTUP_FUNCTION(evt). Here is the example in the Aliss file:
/**
 * Some handy globals
 */
var svgDocument;
var svgRoot;
var running=true;
var animateFrameRate = 100;

function startup(evt) {
        O=evt.target
        svgDocument = O.ownerDocument;
        svgRoot = svgDocument.documentElement;
        normalSize(); // a prep function
        animate(); // start the animation timer
}

function animate(){
        if (!running) return;
        blink(); // if blinking, do blinking sequence
        walkingstep(); // if walking, do walking sequence
        talkingstep(); // if talking, do talking/expressions sequence
        window.setTimeout("animate()", animateFrameRate) // the familiar setTimeout repeat loop
} |
/**
* Some handy globals
*/
var svgDocument;
var svgRoot;
var running=true;
var animateFrameRate = 100;
function startup(evt) {
O=evt.target
svgDocument = O.ownerDocument;
svgRoot = svgDocument.documentElement;
normalSize(); // a prep function
animate(); // start the animation timer
}
function animate(){
if (!running) return;
blink(); // if blinking, do blinking sequence
walkingstep(); // if walking, do walking sequence
talkingstep(); // if talking, do talking/expressions sequence
window.setTimeout("animate()", animateFrameRate) // the familiar setTimeout repeat loop
}
Inclusion of drawings in HTML
After all the functions are in place and tested, we can safely consider adding it to a HTML page. It seems – if my memory serves me correctly – things are added a little cleaner than they were in the past, using objects and params.
For the sake of ease of manipulating the position of the SVG files, I placed them in a div. At the beginning, the scene is hidden so it is useful to set the SVG objects as transparent as so:
<div id="aliss" class="character">
        <object id="alisssvg" data="/splash/aliss/aliss.svg" type="image/svg+xml" width="250" height="440" wmode="transparent">
                <param name="wmode" value="transparent">
        </object>
</div> |
<div id="aliss" class="character">
<object id="alisssvg" data="/splash/aliss/aliss.svg" type="image/svg+xml" width="250" height="440" wmode="transparent">
<param name="wmode" value="transparent">
</object>
</div>
Now that the SVG is present, we need a way to access the actual object so you can invoke the ECMA functions within. Here is an example of how to retrieve the object then invoke the function doFunction which is assumed to be defined in the SVG file:
function getLoadedSVG(svgID) {
        var ok= true;
        var svgdoc = null;
        var object = document.getElementById(svgID);
        if (object.contentDocument) {
                svgdoc = object.contentDocument; // works in Mozilla
        }
        else {
                try {
                        svgdoc = object.getSVGDocument();
                }
                catch(exception) {
                        // ignore errors
                }
        }
        if (svgdoc!=null) {
                return svgdoc.defaultView;
        }
        return null;
}

// Get the SVG object with ID attribute svgID
var svgview = getLoadedSVG('svgID');
if (svgview!=null) svgview.doFunction(); |
function getLoadedSVG(svgID) {
var ok= true;
var svgdoc = null;
var object = document.getElementById(svgID);
if (object.contentDocument) {
svgdoc = object.contentDocument; // works in Mozilla
}
else {
try {
svgdoc = object.getSVGDocument();
}
catch(exception) {
// ignore errors
}
}
if (svgdoc!=null) {
return svgdoc.defaultView;
}
return null;
}
// Get the SVG object with ID attribute svgID
var svgview = getLoadedSVG('svgID');
if (svgview!=null) svgview.doFunction();
Javascript integration
Now that things are embedded nicely, you can use Javascript to move the SVG elements (via its parent) like any other HTML element. To make this task easier, I used JQuery since it makes accessing the parent elements trivial, with the bonus of introducing a slew of special effects. For example, for the final splash page there is a state where Aliss or the White Rabbit walk from their current position to another point on the X-axis: I invoke the ‘walk’ animation which is embedded in the SVG itself then use the animate JQuery function to move the position (and stop the animation when completed.) Another bonus with JQuery is finding elements of a particular class, so when the splash page is viewed on the root level where it has access to the latest 5 posts some content is added to what Aliss ‘says’.
The applications possible is only limited to your imagination!
..Actually, there are limits..
Bah, if there were no limitations then you would of already seen commercial examples by now. But the actual fact of the matter is that SVG support, and SVG-Javascript implementation is not the same in all (modern) browsers despite the time difference of this and the first incarnation.
The methods I have used are still rather more complex than the standard methods of producing animation, and with the double blow that Flash support is normally pretty spot on for most known browsers it is highly unlikely that the SVG+Javascript+HTML would catch on. But I do like seeing it all in action; and if things change in the future then I can reuse the same old SVG files once again – hopefully not forcefully next time!
